If you’ve ever found yourself huddled around a campfire in the freezing cold, trying to make s’mores while your fingers turn into icicles, you must have thought about how I put an end to this unbearable cold. I have a solution for you, say goodbye to chilly nights and frozen marshmallows. Introducing the marvelous marvels of the camping world: tents with stove, these fantastic contraptions blend the best of both worlds, merging the ruggedness of camping with the cozy comforts of home. Imagine waking up to the aroma of fresh coffee brewing right there in your tent. Or whipping up a scrumptious campfire feast – we’re talking mouthwatering marshmallow roasts or even sizzling sausages tents with stove are designed for adventurers of all kinds. Whether you’re a solo explorer, a family of campers, or a bunch of besties seeking a memorable escapade, there’s a stove tent that fits your tribe.
So, if you’re ready to elevate your camping game and transform your outdoor experience, buckle up and get ready to explore the wonderful world of tents with stove.
What should I consider before buying a tent with a stove?
But before you rush out to buy one, let’s discuss a few things you should consider.
1. Size Matters:
Before you start picturing yourself cozied up next to a roaring fire, make sure to check the dimensions of the tent and stove combo. You don’t want to end up with a tent that’s too small to accommodate your camping party and a stove that barely fits a matchstick, right? So, always double-check the size and make sure it can comfortably accommodate both you and your flaming companion.
2. Know your Stove:
Not all camping tent with stove are created equal. Some are powered by gas, others by electricity, but the real camping MVP is the wood-burning stove. It adds that authentic camping feel and lets you channel your inner survivalist by gathering firewood. Just remember, with great heat comes great responsibility, so make sure you’re familiar with how to operate and maintain your chosen stove.
How do you set up a tent with a stove?
Here simple steps of setting up a tent with a stove :
Step 1: Choose the Right Tent:
First things first, you need to pick the perfect tent that’s compatible with a stove. Look for a tent that comes with a stove jack – a specially designed hole that allows the stovepipe to extend safely outside while keeping the tent well-ventilated.
Step 2: Clear the Area:
Before setting up your tent, make sure you choose a suitable spot. Clear away any debris, branches, or flammable materials that might pose a fire hazard.
Step 3: Lay the Groundsheet:
Unroll the groundsheet provided with your tent and ensure it covers the entire area where your tent will be pitched. This will protect your tent floor from moisture and provide an extra layer of insulation against the cold ground.
Now let’s assemble the tent
Follow these simple steps to assemble your tent with a stove:
1. Find a helping hand: Assemble your tent with a friend or family member. It’s always more fun and less frustrating with some company!
2. Lay out all the pieces: Before you start, make sure you have all the necessary components, such as tent poles, stakes, and rainfly. Lay them out so you can easily access them as you go.
3. Connect the poles: Begin by connecting the tent poles according to the instructions provided. Most tents come with color-coded poles, making it easier to match them up. Slide the poles through the designated sleeves or attach them to the clips, depending on the design of your tent.
4. Raise the tent: Once the poles are connected, start raising the tent by gently lifting it from the center. As the tent starts to take shape, secure the poles in the designated grommets or clips to keep them in place.
5. Stake it down: After the tent is fully raised, it’s time to stake it down. Insert the tent stakes through the loops or grommets at the base of the tent and secure them firmly into the ground. This will add stability and prevent your tent from blowing away in the wind.
And now to the rainfly
6. Attach the rainfly:
Now that your tent is fully assembled and staked down, it’s time to tackle the rainfly. The rainfly is like the superhero cape of your tent – it protects you from rain, wind, and other elements that might try to ruin your camping experience.
1. Locate the rainfly: Find the rainfly that came with your tent. It should be a separate piece that matches the shape and size of your tent. Lay it out nearby for easy access.
2. Line it up: Position the rainfly over your tent, making sure it aligns with the shape and size. Most rainflies have multiple attachment points, so take a moment to check which ones correspond to the tent’s grommets or clips.
3. Attach the rainfly: Starting at one end, secure the rainfly to the tent using the provided attachment points. This could be hooks, loops, or even Velcro straps. Take your time to ensure that the rainfly is securely fastened and covers the entire tent.
4. Adjust for ventilation: Some rainflies come with vents to allow air circulation and prevent condensation inside the tent. Make sure these vents are open and facing the right direction to maximize airflow. You don’t want to wake up in the morning feeling like you’ve slept in a sauna!
5. Tighten it up: Once the rainfly is attached, go around the tent and adjust any straps or tensioners.
6. Test it out: Before you celebrate your successful rainfly attachment, give it a little test. Gently tug on the rainfly from different angles to make sure it’s securely fastened. You don’t want any surprises in the middle of the night when you wake up to find your rainfly flapping in the wind like a flag on a pole.
Are tents with stove safe to use?
Many ask, and rightfully so, whether a tents with a stove is safe, “can I really have a wood-burning stove inside my portable abode?” Please let me shed some light on this question.
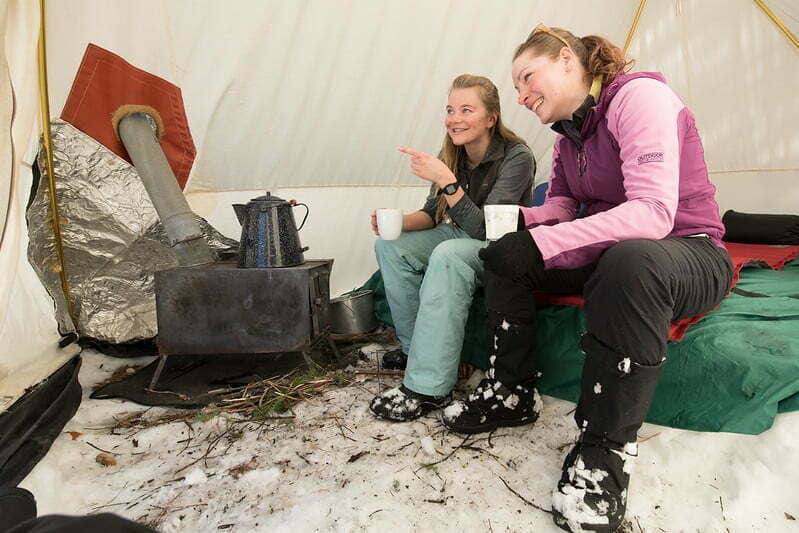
First things first, let’s talk about safety. The idea of having a mini bonfire inside your cozy tent may sound a tad alarming, but tents with stove are designed with safety as the top priority. Tents come equipped with specially designed stovepipes that are heat resistant and have proper ventilation to keep the smoke out and fresh air in. Let’s address the potential hazards. Remember, safety always comes first, even when we’re trying to have a good time. When setting up your tent with a wood-burning stove, it’s crucial to keep a few safety tips in mind. Firstly, ensure you have a fireproof mat or base to place your stove on. This is like a little superhero cape for your tent floor, protecting it from any stray embers or heat. Its recommended to invest in a sturdy mat that can withstand the heat and keep your tent safe.
Next, make sure you have proper ventilation. Just like you need fresh air to survive, so does your stove. Tents with stove come equipped with specially designed stovepipes that have ventilation to keep the smoke out and fresh air in. So, don’t go blocking those vents or sealing up your tent like a can of sardines. Let the air flow and keep things fresh!
Are there any special maintenance requirements for tents with stove?
So, you’ve decided to take your outdoor adventures up a notch and invest in a tent with a wood-burning stove, good call. But wait, there special maintenance requirements for tents with stove:
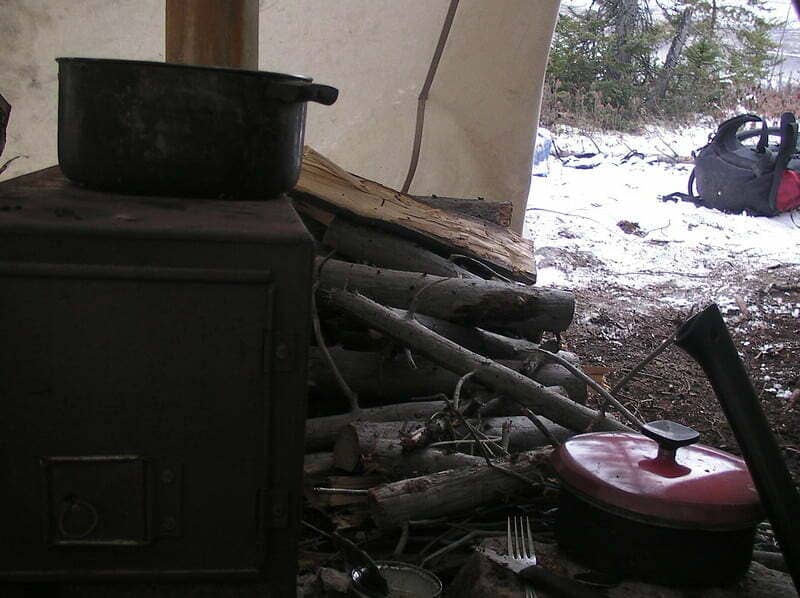
First things first, let’s talk about the star of the show: the wood-burning stove. It’s like having a mini fireplace in your tent – how cool is that? To keep your stove in top-notch condition, there are a few simple maintenance tasks to keep in mind.
1. Cleanliness is next to cozy-ness: Regularly clean out the ash and debris from your stove. Trust me; you don’t want to wake up to a smoke-filled tent because you forgot to do this! Plus, a clean stove will burn more efficiently, providing you with that delightful warmth you crave.
2. Don’t be a chimney ninja: Chimneys are essential for directing smoke and gases out of your tent, so it’s important to keep them clear. Check for any blockages like leaves or critters.
3) Check for Wear and Tear: Give your stove a thorough inspection before each camping trip. Look out for any cracks, loose parts, or signs of damage. If you notice anything amiss, fix it or replace it, so your stove remains a reliable companion during your adventures.
What accessories are needed for a tent with a stove?
Now, let’s go over the essential accessories you need for a tent with a stove :
1. Fireproof Mat:
Let’s start with safety first – a fireproof mat is an absolute must-have! Placing this protective layer under your stove helps prevent any embers or hot ashes from causing damage to the tent’s floor. It ensures your camping adventure doesn’t turn into an unexpected “Survivor” episode!
2. Stove Pipe Jack:
A stove pipe jack is like a magic portal that connects your stove to the outside world. It allows the stovepipe to securely exit the tent while keeping all the cozy warmth inside. This ingenious accessory prevents pesky sparks from escaping and keeps the tent well-ventilated, making it a win-win!
3. Carbon Monoxide Detector:
Safety should always remain a top priority. When using a stove inside a tent, it’s crucial to have a carbon monoxide detector. These compact gadgets detect the presence of this odorless gas, alerting you if levels become hazardous.
What is a portable wood stove?
Ah, the portable wood stove! It’s like having a little campfire buddy that you can take with you wherever you go. A portable wood stove is a compact stove designed specifically for outdoor use. It’s usually made of lightweight materials like stainless steel or titanium, making it easy to carry around on your camping adventures.
These nifty little stoves are perfect for heating up your tent, cooking delicious meals, and even drying wet gear. With a portable wood stove, you can enjoy the warmth and coziness of a fire without the hassle of gathering firewood or dealing with smoke.
The best part about a portable wood stove is that it’s incredibly versatile. You can use it in a variety of outdoor settings, from camping trips to hiking expeditions. Plus, most portable wood stoves come with foldable legs or a compact design, making them super easy to pack and transport. But wait, there’s more, some portable wood stoves even come with additional features like adjustable airflow, removable ash pans, and even built-in cooking surfaces. So, whether you’re a seasoned camper or just starting out, a portable wood stove is a game-changer. It adds that extra bit of comfort and convenience to your outdoor experience.
What fuel sources can I use with my tent stove?
let’s address the burning question (pun intended): what fuel sources can you use for your stove?
1. Wood: Ah, the classic and ever-dependable fuel source, the good ol’ wood. Perfect for those who love the rustic ambiance and the sound of crackling logs. Just make sure to gather dry wood from the surrounding area and keep a small ax or saw handy for chopping those larger pieces into manageable sizes. Remember, firewood etiquette dictates that you only use deadfall, so leave those live trees be!
2. Charcoal: If you’re aiming for a cleaner and more controlled burn, charcoal is the way to go. It’s like the well-behaved cousin of wood. Charcoal lights up quickly, burns evenly, and produces a consistent heat output. Plus, it’s relatively lightweight and doesn’t leave a mess behind. To use charcoal as your fuel source, simply bring along some charcoal briquettes. They’re compact, easy to store, and will keep your tent stove churning out heat like a champ.

3. Propane: Using propane as a fuel source for your tent stove has its perks. First and foremost, it’s incredibly easy to use. No more fussing around with chopping wood or lighting charcoal. With propane, all you need to do is connect your stove to a propane tank, turn the knob, and voila! Instant heat.
Not only is propane easy to use, but it also burns cleanly. Say goodbye to smoky campfire clothes and hello to fresh-smelling gear. Plus, with propane, you don’t have to worry about finding dry wood or dealing with messy charcoal. It’s a win-win situation. Another advantage of using propane is its versatility. You can regulate the heat output with just the turn of a knob, allowing you to cook your meals to perfection. No more burnt sausages or half-cooked pancakes.