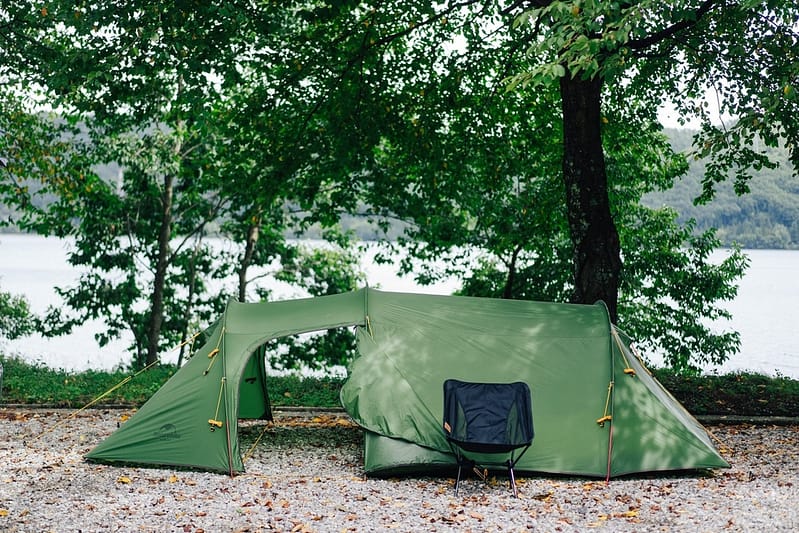
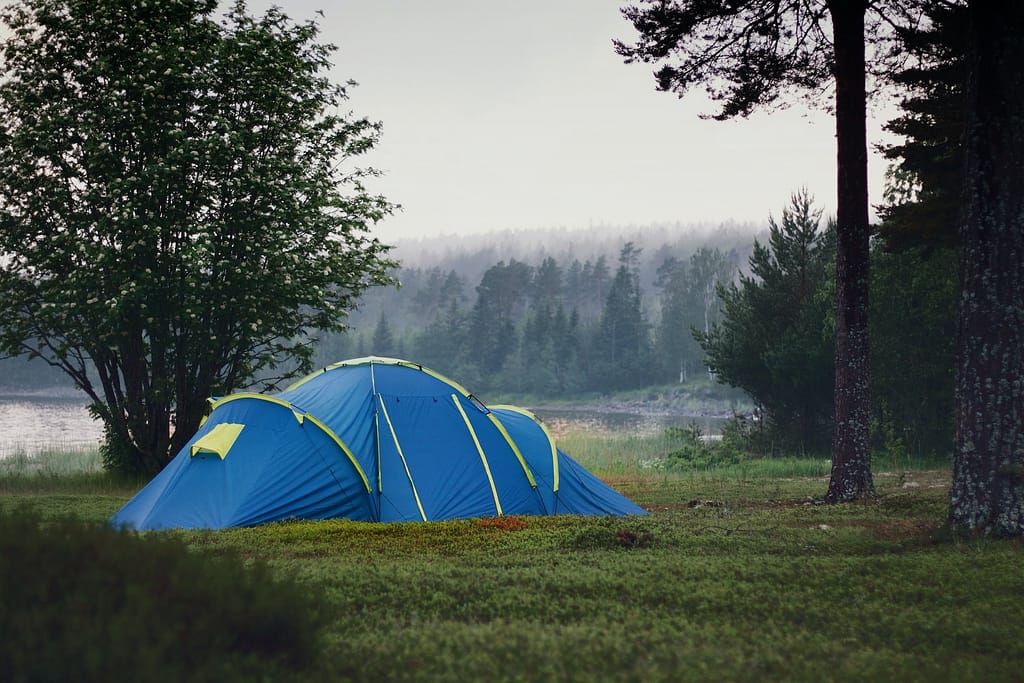
Are you planning a camping trip with a large group? Look no further than tunnel tents. These spacious and easy-to-set-up shelters are perfect for accommodating multiple people comfortably. In this blog post, we’ll explore the benefits of tunnel tents, discuss important factors to consider when choosing a tunnel tent, and highlight some of the top options available for large groups. Whether you’re heading out on a family adventure or organizing a camping trip with friends, these tunnel tents will provide all the space and convenience you need. Let’s dive in!
Benefits of Tunnel Tents
1. Easy and Setup Quick: Setting up your outdoor
camp has never been easier with the top tunnel tents designed for large groups. The easy-to-follow assembly instructions make pitching a breeze, even for first-time campers. With color-coded poles, you can quickly identify which piece goes where, ensuring a seamless setup process. No more struggling with tangled tent poles – the integrated pole sleeves provide a hassle-free experience, saving you time and effort so you can focus on enjoying your camping adventure.
- Easy-to-follow assembly instructions
- Color-coded poles for easy identification
- Integrated pole sleeves for hassle-free setup
Tunnel tents make camping a breeze with their easy setup and spacious interior, allowing you to spend more time enjoying nature and less time on logistics.
2. Spacious Interior: Tunnel tents provide ample space for large groups of people to comfortably camp together. Whether you’re with family or friends, these tents offer enough room to stretch out and relax after a day of outdoor adventures.
Spacious Interior benefits:
a. With its tall peak height, this tunnel tent provides ample standing room for a comfortable outdoor experience. Whether you’re changing clothes or simply enjoying the view, the extra headspace makes all activities more enjoyable.
b. Perfect for group camping trips, this tent comes with multiple room dividers that allow you to create separate sleeping areas. Say goodbye to cramped quarters and hello to privacy and organization.
c. Designed with large groups in mind, this tunnel tent offers generous floor space to accommodate both people and gear without feeling crowded. Enjoy plenty of breathing room while still having everything you need within reach.
3. Excellent Ventilation
Breathable mesh panels create optimal airflow in our outdoor tunnel tents, allowing fresh air to circulate while effectively keeping insects at bay. Our innovative design ensures a comfortable camping experience without compromising on ventilation.
Experience personalized airflow control with adjustable flaps on the ventilation windows of our top-of-the-line tunnel tents. Whether you prefer a gentle breeze or maximum air circulation, these convenient features let you tailor the tent’s environment to suit your preferences.
Say goodbye to condensation buildup inside your tent! Strategically placed vents in our tunnel tents ensure proper air circulation, preventing moisture from accumulating and creating a damp interior atmosphere. Enjoy a dry and comfortable camping experience even during humid conditions.
Factors to Consider When Choosing a Tunnel Tent:
Weight and Portability
Weight and Portability:
- A lightweight tunnel tent is essential for easy transport during outdoor adventures.
- Consider the packed size of the tent when choosing a portable option.
When selecting a tunnel tent, it’s important to prioritize weight and portability. Opting for a lightweight design ensures hassle-free transportation, allowing you to effortlessly carry the tent from one campsite to another. Additionally, consider the packed size of the tent as it contributes to its overall portability.
Durability and Weather Resistance
When it comes to durability and weather resistance, material quality and waterproof rating are two essential aspects to look for in a tunnel tent. Opting for tents made from high-quality materials guarantees their long-lasting performance against harsh elements while ensuring your comfort and safety during outdoor adventures. Similarly, choosing a tent with a higher waterproof rating provides added protection against heavy rain or snow showers, keeping you dry inside the tent even in challenging weather conditions.
Capacity
Sleeping capacity is a crucial factor to consider when choosing a tunnel tent for large groups. These tents typically offer spacious interiors that can comfortably accommodate anywhere from 6 to 12 people, ensuring everyone has enough room to sleep and move around.
In addition to ample sleeping space, storage capacity is another important feature of tunnel tents. With multiple storage pockets and gear lofts, these tents provide convenient places to store your belongings, keeping the interior organized and clutter-free. This allows you to make the most of your camping experience without worrying about limited space or misplaced items.
Setup Difficulty
Number of poles: Tunnel tents typically have fewer poles compared to other tent styles, making them easier and faster to set up.
Time required for setup: With their simple design, tunnel tents can be set up in a matter of minutes, saving you time and effort.
- Fewer poles to assemble
- Quick and efficient setup process
Is a Tunnel Tent Suitable for Extreme Weather Conditions?
When it comes to selecting a tent for extreme weather conditions, it’s important to consider various factors such as durability, stability, and overall performance. One popular tent design that often comes up in this discussion is the tunnel tent.
Advantages of Tunnel Tents in Extreme Weather:
1. Aerodynamic Design:
Tunnel tents are renowned for their streamlined shape, which allows them to efficiently withstand high winds. The curved design helps divert wind flow over the tent rather than against it, reducing the risk of structural failure.
2. Enhanced Stability: Tunnel tents typically have multiple pole arches that intersect, creating a sturdy skeletal structure. This design distributes pressure evenly, making them more resilient against gusts and heavy snow loads.
3. Improved Water Resistance: The sloping walls of tunnel tents facilitate efficient rainwater runoff, preventing pooling and leakage. This feature is particularly useful during heavy rainfall or snowstorms, reducing the risk of water seeping through the fabric.
4. Space: Tunnel tents are known for their generous living space and headroom, allowing occupants to comfortably hunker down during extended periods of inclement weather. This additional space can also accommodate gear storage, providing convenient organization options.
Limitations of Tunnel Tents in Extreme Weather:
1. Directional Strength: While tunnel tents excel at withstandinghigh winds, the direction of the wind can still impact their performance. It is important to set up the tent in a way that aligns with the prevailing wind direction to maximize its stability.
2. Snow Accumulation: While tunnel tents are designed to handle heavy snow loads, excessive accumulation can still pose a challenge. It is important to regularly clear snow from the tent to prevent unnecessary stress on the structure.
3. Hurricane: Tunnel tents are not recommended for use during hurricanes or other extreme weather events with extremely high wind speeds. The design and materials of tunnel tents may not be able to withstand the intense forces exerted by hurricanes, and using one in such conditions could be dangerous.
4. Condensation: Due to their single-wall construction, tunnel tents may experience higher levels of condensation compared to double-wall tents. This can be mitigated by proper ventilation and strategic placement of vents.
5. Limited Adaptability: Tunnel tents are designed for specific weather conditions and may not perform as well in other environments. For example, their streamlined shape may make them less suitable for extremely hot or humid climates.
In conclusion, tunnel tents are a viable option for extreme weather conditions due to their aerodynamic design, enhanced stability, and improved water resistance. However, they do have limitations such as directional strength, snow accumulation, condensation, and limited adaptability. It is important to carefully consider these factors when choosing a tent for extreme weather conditions and to properly set up and maintain the tent to ensure its optimal performance.
What Materials Are Used to Make Tunnel Tents?
Tunnel tents are a popular choice among campers and outdoor enthusiasts due to their lightweight construction, spaciousness, and ease of setup. These tents are designed with a curved pole structure resembling a tunnel, providing stability and maximized interior space. When it comes to the materials used in the manufacturing of tunnel tents, several components play a crucial role in ensuring durability, weather resistance, and overall performance. Let’s explore the key materials commonly used in the construction of tunnel tents:
1. Tent Fly Fabric:
The tent fly, also known as the outer layer or rainfly, is the first line of defense against the elements. It is typically made from ripstop nylon or polyester fabric, which are lightweight yet durable options. These materials are often treated with waterproof coatings, such as polyurethane (PU) or silicone, to enhance their water resistance capabilities. Ripstop nylon or polyester fabric helps prevent tears from spreading if punctured, ensuring the longevity of the tent.
2. Tent Floor Fabric:
The tent floor is the bottom part of the tent that provides protection against the ground, moisture, and insects. To withstand abrasion and resist moisture, tent floors are commonly constructed using materials like nylon or polyester with a waterproof coating. These fabrics are often reinforced with thicker denier (a unit of measure for the thickness of fibers) threads or laminated with polyurethane (PU) for added durability.
3. Tent Poles:
The curved structure of tunnel tents relies on sturdy poles for support. Traditionally, tent poles were made of metal, such as aluminum or steel, for their strength and durability. However, advancements in technology have introduced lighter and more flexible materials, such as fiberglass or carbon fiber, which are now commonly used in tunnel tent pole construction. These materials provide the necessary strength and flexibility to withstand strong winds and maintain the tent’s shape.
4. Tent Guy Lines and Pegs:
To enhance the stability of the tent, guy lines and pegs are used to secure the tent to the ground. These components are typically made from nylon or polyester, which offer strength and resistance to stretching. Additionally, they are often reflective to improve visibility at night.
5. Ventilation Panels:
Proper ventilation is essential to prevent condensation and maintain a comfortable interior climate. Tunnel tents often feature ventilation panels made of mesh or breathable fabrics to allow airflow while keeping insects out. These materials are lightweight and durable, ensuring a balance between airflow and protection.
How Do You Set Up a Tunnel Tent?
Tunnel tents are a popular choice for outdoor enthusiasts due to their easy setup and spacious interior. If you’re unfamiliar with setting up a tunnel tent, don’t worry! In this blog post, we will guide you through the step-by-step process to help you pitch your tunnel tent with ease.
1. Choose a suitable location:
Start by selecting a flat and level area to pitch your tent. Make sure there are no sharp objects or rocks that could potentially damage the tent floor.
2. Unpack and lay out the components:
Lay out all the components of your tunnel tent, including the tent body, poles, rainfly (if applicable), groundsheet, stakes, and guylines. Take a moment to familiarize yourself with each component.
3. Assemble the poles:
Connect the individual tent poles according to the provided instructions. Most tunnel tents feature color-coded poles or sleeves to simplify the assembly process. Ensure that the poles are fully connected and secure.
4. Insert the poles into the tent sleeves:
Gently insert the poles into the designated sleeves of the tent body. Start with the longest pole and work your way to the shortest ones. Avoid bending or forcing the poles to prevent any damage.
5. Raise the tent:
With the poles inserted, lift the tent body off the ground while keeping the poles upright. Enlist the help of a partner if needed. Gradually extend the poles to their full length, arching them to form the tunnel shape. Make sure the poles are securely in place and not leaning or wobbling.
6. Stake down the tent:
Once the tent is raised, stake down the corners and sides of the tent to secure it in place. Use the provided stakes and hammer them into the ground at a 45-degree angle. Make sure the stakes are driven in fully and tightly.
You can find here a comperhansibe A-Z guide for staking a tent.
7. Attach the rainfly (if applicable):
If your tunnel tent comes with a separate rainfly, attach it to the tent body using the provided clips or hooks. Make sure the rainfly is taut and covers the entire tent for maximum protection against rain or snow.
8. Secure the guylines:
Use the guylines provided with your tent to further stabilize it in windy conditions. Attach the guylines to the designated loops or rings on the tent body and stake them into the ground at a 45-degree angle. Adjust the tension of the guylines as needed to ensure the tent is secure and stable.
9. Set up the interior:
Once the tent is fully pitched, you can start arranging the interior to your liking. This may include setting up sleeping pads, organizing gear, and hanging lanterns or other lighting options.
10. Test the stability and adjust if needed:
Before settling in for the night, take a moment to check the stability of your tent. Gently push on the poles and shake the tent to ensure it is properly secured. If needed, adjust the stakes, guylines, or pole tension to improve the stability of the tent. Remember, it’s better to make any necessary adjustments now than to wake up in the middle of the night to a collapsing tent.
11. Take down and pack up:
When it’s time to pack up your tunnel tent, follow these steps in reverse order. Start by removing the guylines and rainfly (if attached), then carefully disassemble the poles from the tent sleeves. Make sure to detach the poles gently to avoid any damage. Once the tent is disassembled, fold it up neatly and place it back into its carry bag or storage sack. Be sure to clean off any dirt or debris from the tent before packing it away.
What is the Best way to pack a tunnel tent?
Tunnel tents are a popular choice for camping and outdoor adventures due to their lightweight design and spacious interior. Packing a tunnel tent properly is essential to ensure its longevity and to make setting up and taking down the tent a breeze. Here are some expert tips on the best way to pack a tunnel tent:
1. Clean and dry the tent:
Before packing your tunnel tent, make sure it is clean and completely dry. This prevents the growth of mildew and prolongs the lifespan of the tent. Wipe off any dirt or debris and air-dry it thoroughly.
2. Remove tent stakes and poles:
Begin by removing the tent stakes and poles from the tent. Gather all the stakes and ensure they are clean and dry before storing them separately. Detach the poles carefully, making sure not to damage them.
3. Fold the tent groundsheet:
Lay the tent groundsheet flat on the ground and fold it neatly, making sure there are no wrinkles or creases. Start folding from one end towards the other, keeping the folds tight and even. This prevents any dirt or moisture from transferring onto the tent fabric.
4. Fold the tent body:
Lay the tent body on top of the folded groundsheet, aligning the corners and edges. Start folding the tent body in half lengthwise, then fold it in half again. Finally, fold it into thirds or quarters, depending on the size of your tent. The goal is to create a compact, rectangular shape.
5. Roll or stuff thetent:
Once the tent body is folded, you can choose to either roll or stuff it into its carry bag or storage sack. Rolling the tent is the preferred method as it helps maintain the shape of the tent and prevents unnecessary wrinkles. Start by rolling the tent from one end to the other, making sure to keep the roll tight and even. If you prefer to stuff the tent, make sure to push it into the bag or sack gently to avoid any damage to the fabric or zippers.
6. Pack the rainfly and guylines:
If your tunnel tent has a rainfly and guylines, make sure to detach them and pack them separately. Fold the rainfly neatly and place it in a separate bag or pocket. Coil the guylines and secure them with a twist tie or rubber band to prevent tangling.
7. Check for any loose items:
Before closing the bag or sack, double-check to make sure there are no loose items such as tent pegs or small accessories. These can easily get lost or cause damage to the tent fabric if not properly secured.
8. Store in a dry and cool place:
Once packed, store your tunnel tent in a dry and cool place. Avoid storing it in direct sunlight or extreme temperatures as this can damage the fabric and coatings. A dry basement or closet is a good option for long-term storage.
By following these expert tips, you can ensure that your tunnel tent is packed properly and ready for your next camping adventure. Taking
How do you repair a tear in a tunnel tent?
Let’s dive in to a step-by-step instructions on how to effectively repair a tear in a tunnel tent, ensuring it remains durable and functional for your future adventures.
1. Assess the Damage:
Before starting the repair process, carefully examine the tear in your tunnel tent. Determine the size, shape, and location of the tear to gauge the complexity of the repair. This will help you select the appropriate repair method and materials.
2. Clean the Affected Area:
Thoroughly clean the torn area of the tent using a mild soap or tent-specific cleaner. Ensure that the area is free from dirt, debris, and any existing adhesive residue. Gently pat-dry the area with a clean cloth to allow better adhesion during the repair process.
3. Prepare the Repair Materials:
Based on the tear’s characteristics, choose an appropriate repair method. For smaller tears, consider using a tent repair tape or adhesive. For larger or more complex tears, a patch kit or sewing may be required. Ensure you have all the necessary materials readily available before proceeding.
4. Tent Repair Tape or Adhesive:
If the tear is small and straightforward, tent repair tape or adhesive can be an effective solution. Cut the tape or adhesive to cover the entire tear, making sure to extend beyond the damaged area for proper reinforcement. Carefully apply the tape or adhesive to the torn area, ensuring a smooth and secure application. Press down firmly to ensure proper adhesion.
5. Patch Kit or Sewing:
For larger or more complex tears, a patch kit or sewing may be necessary. If using a patch kit, carefully cut a patch that is slightly larger than the tear. Apply a strong adhesive to the back of the patch and press it firmly onto the torn area, ensuring all edges are secure. If sewing, use a heavy-duty needle and thread specifically designed for outdoor gear. Stitch around the tear, creating a tight and even seam to reinforce the damaged area.
6. Allow for Proper Drying and Curing:
After applying the repair method, allow the adhesive, tape, or patch to dry and cure according to the manufacturer’s instructions. This will ensure maximum strength and durability of the repair.
7. Test the Repair:
Once the repair has fully dried and cured, test the strength and integrity of the repaired area. Apply gentle pressure to the tear to ensure it holds up under tension. If the repair is secure and the tear does not reopen, you can proceed with confidence.
By following these steps, you can effectively repair a tear in your tunnel tent, ensuring it remains reliable and functional for future outdoor adventures. Remember, regular maintenance and care can help prevent tears and prolong the lifespan of your tent.
What accessories should I buy for a tunnel tent?
There are a few essential accessories you should consider purchasing for your tunnel tent. These accessories will not only provide added comfort but also improve the durability and usability of your tent. Here are some recommendations:
1. Groundsheet or Footprint:
Investing in a groundsheet or footprint is crucial for protecting the tent’s floor from abrasion, moisture, and punctures. This accessory acts as a barrier between the tent and the ground, extending the lifespan of your tent by preventing wear and tear. It also helps keep the interior of your tent clean and dry.
2. Tent Stakes:
While most tunnel tents come with stakes, having a set of high-quality and sturdy ones is always a good idea. Tent stakes are essential for securing your tent firmly to the ground, especially in windy conditions. Consider investing in lightweight but durable stakes made of aluminum or titanium for better performance.
3. Guy Lines and Adjusters:
Guy lines are cords used to stabilize and secure the tent. They help distribute the tension evenly and prevent the tent from swaying or collapsing in windy conditions. Opt for reflective guy lines to avoid tripping over them at night. Additionally, adjustable guy line tensioners allow you to easily tighten or loosen the lines as needed.
4. Tent Repair Kit:
Accidents can happen, and having a tent repair kit on hand will save you from any unexpected mishaps. Look for a tent repair kit that includes adhesive patches, a sewing kit, and a seam sealer. These items will allow you to quickly and effectively repair any tears, punctures, or loose seams that may occur during your outdoor adventures.
5. Tent Lights:
Adding tent lights to your accessories list can greatly enhance your camping experience. They provide illumination inside the tent during nighttime, making it easier to navigate and perform tasks. Look for lightweight and portable options that are battery-powered or rechargeable for convenience.
6. Tent Fan:
If you frequently camp in hot or humid climates, a tent fan can be a lifesaver. It helps improve air circulation inside the tent, keeping it cool and comfortable. Look for a fan that is compact, lightweight, and runs on batteries or has a USB charging option.
7. Tent Organizer or Hanging Storage:
Staying organized in a limited space can be challenging. A tent organizer or hanging storage system can help keep your belongings tidy and easily accessible. Look for options with multiple pockets or compartments to store small items like keys, phones, and flashlights.
8. Tent Footprint:
While a groundsheet or footprint is essential for protecting the tent’s floor, an additional tent footprint can offer extra protection and insulation. It provides an extra layer between the ground and the tent, preventing moisture seepage and improving overall comfort.
Alternative to Tunnel Tent
1. Dome Tent

Dome tents are a popular alternative to tunnel tents. They are known for their sturdy and stable structure, making them suitable for various weather conditions. Dome tents have a rounded shape and are supported by multiple poles that cross over each other, creating a strong framework. This design allows for better wind resistance and stability compared to tunnel tents.
Dome tents also offer more headroom and interior space. The sloping walls maximize usable space and provide a comfortable living area. They are easy to set up and usually require fewer stakes and guy lines compared to tunnel tents.
Another advantage of dome tents is their versatility. They come in various sizes, from small solo tents to large family-sized tents. They are also available in different configurations, such as freestanding or semi-freestanding, providing flexibility in terms of setup and placement.
In terms of durability, dome tents are often made of durable materials such as polyester or nylon. They are designed to withstand harsh weather conditions, including rain and wind. Some dome tents also come with features like reinforced seams and waterproof coatings for added protection.
2. Pop up Tent

Pop up tents are another alternative to tunnel tents that offer convenience and ease of use. As the name suggests, these tents can be set up in a matter of seconds by simply popping them open. They usually come with pre-attached poles that eliminate the need for complicated assembly.
Pop up tents are lightweight and compact, making them ideal for backpacking or camping trips where portability is important. They are designed for quick and easy setup and takedown, making them a great option for those who want to spend less time setting up camp and more time enjoying the outdoors.
While they may not offer the same level of stability and durability as tunnel or dome tents, pop up tents can still provide a comfortable shelter for a night or two. They are typically made of lightweight materials like polyester or nylon and may have a rainfly for added weather protection.
One thing to consider with pop up tents is their limited interior space. They are often designed for 2-3 people, so if you have a larger group or need more room for gear, a larger tent may be necessary.
Overall, both dome tents and pop up tents offer alternatives to tunnel tents that cater to different needs and preferences. Whether you prioritize stability, convenience, or portability, there is a tent option out there that will suit your camping style.
3. Inflatable Tent
Inflatable tents are a newer innovation in the camping world and offer a unique set of advantages. Instead of traditional poles, these tents utilize inflatable beams or tubes to provide structure and support. This not only makes setup incredibly fast and easy, but it also eliminates the need for heavy and bulky poles.
Inflatable tents are known for their stability and durability. The inflatable beams are designed to withstand strong winds and provide a sturdy shelter. Additionally, these tents often have reinforced seams and waterproof materials to ensure protection from the elements.
One of the major benefits of inflatable tents is their spaciousness. Due to the absence of traditional poles, the interior space is maximized, providing ample room for sleeping and storing gear. Many inflatable tents also come with multiple rooms or partitioned areas, allowing for privacy and organization.
Another advantage of inflatable tents is their versatility. They come in various sizes and configurations, ranging from small backpacking tents to large family-sized structures. Some models even have inflatable awnings or extensions, providing extra space for relaxing or cooking.
In terms of portability, inflatable tents are relatively lightweight and compact. They can be easily packed into a carry bag and transported to different camping locations. However, it is important to note that they do require an air pump for inflation, which adds to the overall weight and bulkiness.
Conclusion
In conclusion, inflatable tents are a great option for campers who prioritize convenience, durability, and spaciousness. These tents are easy to set up, thanks to their inflatable beams or tubes, and they eliminate the need for heavy and bulky poles. They are known for their stability and durability, with reinforced seams and waterproof materials to protect campers from the elements. Inflatable tents also offer versatility, with various sizes and configurations available, and some even have inflatable extensions for extra space. While they are relatively lightweight and compact for portability, they do require an air pump for inflation. Overall, inflatable tents are a reliable and practical choice for campers of all types.